How to make an online course – Part 4: Edit / Review
In the last couple of posts, we’ve focused on creating and recording content and that means we will now be moving on to the part of the process when you edit / review.
Backup
One key topic that you can find missing on many video creation guides is that of the topic of managing your data. Once you go through the process of creating videos you will realise how time consuming it is and so the last thing you will want to have happen is for your creations to be lost. This can happen for any number of reasons including files being saved over, hard drive corruption and even hard drive failure.
The other issue here is the difficulty of recalling what each file includes when you’re trying to find a particular scene to splice into the current edit that you are working on. Here your naming conventions will matter and so ensure that you have a plan for the approach that you will use and make sure that you stick to it. This can be an area of some efficiency if you will be recording hundreds of small clips. If you haven’t already been abiding by best practice, the point before you go to edit your content is the ideal time to upgrade your process.
The solutions to these problems is to have a dedicated process for saving your videos:
- Adopt a file naming convention and stick to it. If need be, find a way of linking file names to your storyboard and / or use a spreadsheet.
- Maintain a distinction either by file naming convention or “save location” between your raw, unedited files and the edited files. Often this can be managed by the software you use to edit content as they insert a proprietary file name convention without you needing to do anything. The default save location that the software uses may also keep the raw and edited files separate.
- Consider adopting a multiple backup process to manage your data such as saving to an external hard disk and a USB drive in addition to your main hard drive on your principal device. This is also important if you are using web/cloud-based editing solutions in which case you will need to download the content to your principal device at some stage.
- If you are using any cloud-based services to save your content, consider using 2 factor authentication security if possible to make sure that your content cannot be stolen.
Initial review
There can be a marked difference in the reception that raw footage receives compared to edited final footage. Knowing how to achieve this improvement relies on having clarity on what areas you need to improve in your raw footage. Situations where the feedback suggests that there are major changes needed in the raw footage should not really be occurring at this stage apart from the odd exception. At this stage you are really hoping for minor changes, ideally something that does not require you re-shoot any footage. To spot these kinds of things, it can be a good idea to get someone else to view the content, if possible, as a fresh pair of eyes and ears is more likely to spot improvements.
It’s not necessary for this person to view all of your content but viewing a sample can give you a good steer on some things that may repeat in the rest of your output. It’s worth then editing one video in line with the suggested improvements and getting feedback on that.
It’s possible that you meander down some dead-ends when going about your editing as you try different things and they don’t work out how you intended. This is normal and it’s worth doing this early and getting clarity on what works so that you can turn the editing process into something that is highly efficient.
Editing software
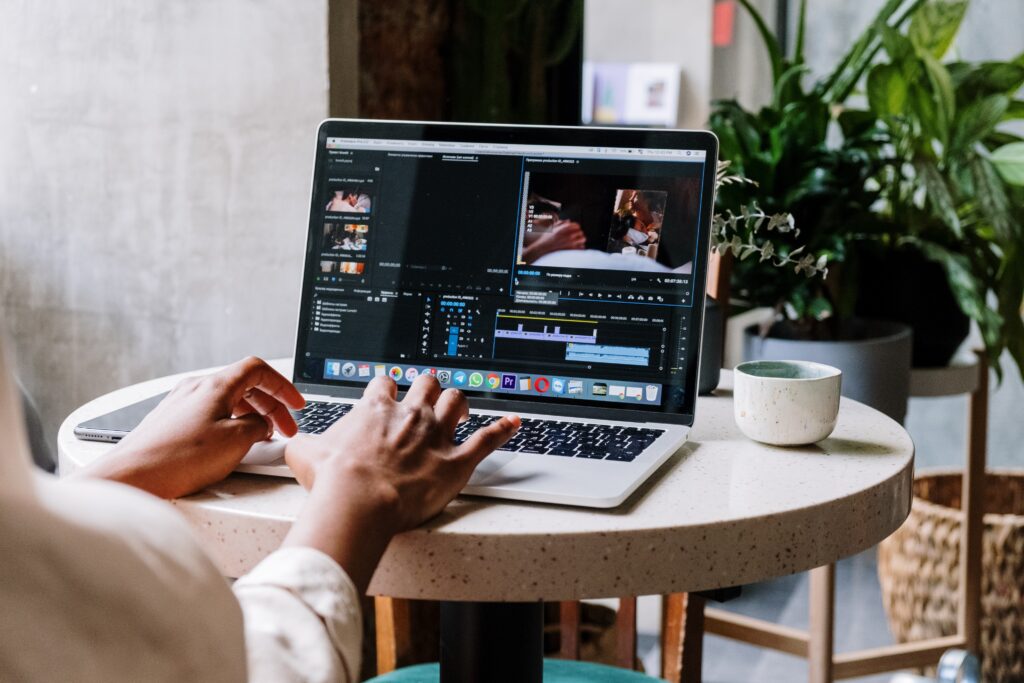
There is a range of editing software applications for your to spruce up your raw footage and turn it into a professional looking production. In addition to the many free options that are available, you may find that many people opt for the likes of Camtasia, Adobe Premiere Pro or Final Cut Pro and so on. These two software types are high end and can take some time for people to feel comfortable with the array of features they have. If you’re new to these software options you can learn more about how to use them through the variety of free tutorials they make available on YouTube. There are certainly more videos available than we have shown here but you can get a good idea of the level of teaching.
Adobe Premiere Pro
Camtasia
Things to watch out for
When you did your initial storyboarding you hopefully developed a clear idea of what your end product would look and sound like. This is what you are aiming for as well as editing out other incidental errors during the creating / recording phase. The main things that we might expect to take up some time during this process would be things like adding intro and/or outro scenes to the raw footage, cutting out dead time, scanning for things that should (not) be visible / audible and correcting for these. An example of the latter could be that you may have chosen to describe something in your script but when watching it you feel like some additional illustration is required so you overlay a diagram onto you raw content. Here are a few pointers on what to watch/listen out for.
Audio
- Is the audio content free of background noise, echoes and muffled sound?
- Is the audio must be matched (synchronised) to the video?
- Is the volume appropriate when played on different devices?
- Have you checked that you have the right to use all audio content contained within the video for commercial purposes?
Video
- Is the pace of the video appropriate? It’s especially worth checking this during any transitions you may have between scenes.
- Is there appropriate emphasis on the key learning point in the video? If not, can you edit something in (e.g. a visual cue) to make this more apparent?
- Is there a coherence in the visual styles used throughout (e.g. fonts, colour palette etc.)
- Have you checked that you have the right to use all visual content contained within the video for commercial purposes?
Accessibility
One point that is worth looking out for are the accessibility guidelines that we shared previously here. It’s worth taking a look at them again if you are planning to be creative about any edits you intend to make to your videos. If there is one aspect we could emphasise at this stage of the process it is that it is worth considering adding subtitles to your videos to increase accessibility.


Responses